Sunday, July 22, 2012

More Mesa Gardens Built!


I'm happy to report that my Mesa Garden project has been very successful thus far. The only drawback is that the constant construction has made me wait very late into July to actually set out transplants. I'll start here with the Mesa in front of the greenhouse. This was taken on July 4, 2012.


This was my first free standing Mesa and the beans are doing well.


I decided it was about time I set out some signs to let the furry bastards know that I mean business!


On July 12, 2012, my Maximilian Sunflowers were in bloom at the end of my driveway.


Now I have three Mesa Gardens at the front of the house. Each one is 8 feet by 2 feet.


I am amazed at how much can fit into a relatively small area. The best part is that there is no bending or kneeling - all transplants were a breeze to put out, all I had to do was stand and work at table height!


Watering is easy too. It only takes 10 minutes a night after the relentless sun goes down.


The following week I tackled my most ambitious Mesa structure (so far) by building a 24 foot long base in three 8 foot sections. This will be accommodating my heirloom tomato collection.


I then built three 8 foot by 16 inch soil beds out of fur strips and 2x3s.


I dread the digging part of each garden, but 14 holes later, I'm ready to level and set the legs. Note that I omitted 2 legs on the last 2 sections.


This saved wood and I was able to temporarily clamp the sections during the initial set up. I simply drilled pilot holes into the 2x3s and used nails to connect the last two sections once the legs were set & secure.
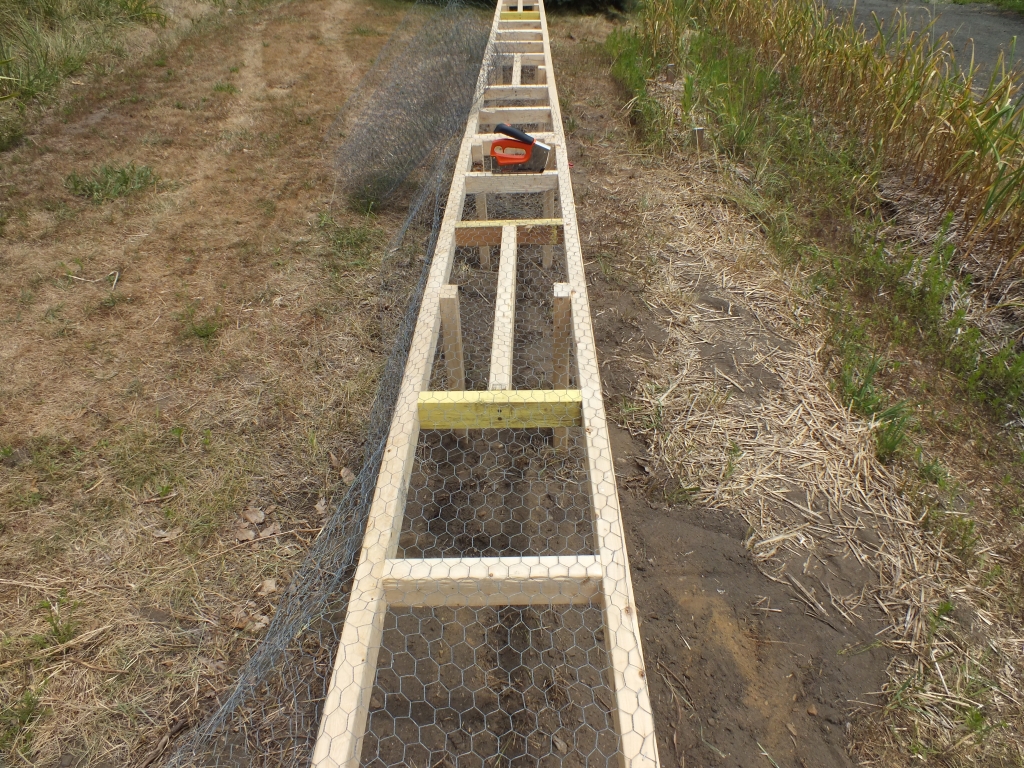

Now that I've learned that putting poultry fence around a garden is a useless defense... (good one!)
I'm recycling the fencing, using it as my base in conjunction with the black weed guard to hold the soil in place.


Each 8 foot section gets 5 cubic feet of soil. I made the legs shorter because the average tomato plant can be 5 to 6 feet tall. I will have to later install a fence because whistle pigs can and will climb!


I added a 3 foot tall wall for the tomatoes to be tied up and allowed to climb. I can make it 3 feet taller when needed. Those funny looking flowers in the front row are called Balsam Flower a.k.a. Touch Me Not.
Hey, you Ground Hogs -- Any questions?


This is what the front of the greenhouse looked like on July 15, 2012. The cucumbers are being trained to climb up the jute netting that I created earlier in the season.


Close up of a cucumber blossom.


Close up of a zucchini blossom.


Close up of Ruby lettuce.


Side view of greenhouse Mesa Garden.


On July 22, 2012 I harvested the garlic in the cool of the morning. I filled the trailer with just over 250 plants.


At this point, it's best just to shake-off the dirt (don't wash them) they need to be tied in bunches of 10 and hung in the hot, dry rafters to cure.


That's me, hanging the garlic in the rafters of the breezeway!


These can be hung until the October planting day or can be used in as little as 2 weeks.


I didn't bother hanging the smallest of the bulbs. I cut the necks to 1 inch and trimmed the roots and they can cure in this basket. I will use these in my daily cooking.


The pumpkin plant in my cedar mesa needs a bit of gentle persuasion... so I tied a small block of a 2x3 to help train it to grow down and away from the beans.


The onion sets that were planted this season had a rough year due to heavy rains in May (over 5 inches) and then no significant rain to speak of since then. The dry of July did them in with most of the tops dried to nothing, so I had to dig them up today. Most are about the size of a golf ball - still very usable!


This was the first year I ever tried to grow shallots. Apparently, you plant one and it morphs into three! These were the only ones ready today, I should have many more in a week or two.

:)

Saturday, June 30, 2012

June 2012

I'm building Mesa Gardens because of these guys...
In mid-June I counted five babies running around.


This one let me get real close for these shots.


They're not as ugly when they're young, but that will change over time...


Ya, ha ha, very cute hiding under the wood pile...


The first mesa garden out in front of the green house is doing nicely.


I made sure to build a nice big gate for easy access.


A lot can fit into this 9 foot by 2 foot garden. I put in 2 tomato plants,
two varieties of lettuce, 6 cucumber plants, 6 cauliflower plants, 
2 zucchini plants and one African marigold!


I began working on my first freestanding mesa garden on June 16, 2012.


It really looks lonely out there... but don't worry, it will have 
plenty of company in July!


The 8 foot by 2 foot box was made from recycled cedar siding.
On June 19, 2012, I planted 3 varieties of bush beans,
a few Russian Mammoth sunflowers, and 1 pumpkin plant.


Here's a photo of a baby bean sprout on June 23, 2012 - that's
just 4 days germination time!


Meanwhile, I've decided to plan for my future garlic this fall by
planting a cover crop of sweet clover.


I couldn't believe how sweet the seeds smelled as
I spread them around the newly tilled soil!
I will till the clover crop in early October to make way
for the largest garlic crop ever!
:)

Thursday, May 31, 2012

First Mesa Garden Started in May

I'll begin with a follow up photo of how the onions are doing. 


I think they're doing great! 
The onions are about a foot tall and have enjoyed the 5 plus inches of rain that fell this month. 
I snuck-in a few Iran pumpkins (left) and some cucumbers (right) about a week ago.


May 06, 2012.
 I decided that it was time to finish the greenhouse off with a mini deck.
After all, I needed to address the big 1 foot step up to the door.
My two favorite things to build with are 2x3s and fur strips.


Each support post is set in concrete with nails at each base to keep it from shifting.


3 supports were needed on the end and later, I added another in the center.


Now that the fur strips are nailed in place it's time for a paint job.


Here's another angle before I paint.


I used silver gray porch paint.


I still needed a step, so again I dug holes and set posts and set them in concrete.


I began my first Mesa Garden on May 28, 2012.
This on had to be 9 feet long to fit onto the front of the green house.


The first section was fit into place and holes were dug for 2 support posts.


I'm really getting tired of digging holes!


Here's a view of the support post with my handy roofing nails acting as re-bar at the base.


I let the posts set in concrete overnight then added the table base.
Note that I added 7 supports inside of the frame.
This is because the soil will weigh well over 100 pounds when added.
I stapled 2 foot poultry fence to the top of the base.


Next, I stapled 2 foot wide Weed Guard over the poultry fence.
This will keep the soil in place but allow water to seep through.


I created a 6 inch deep box out of scrap wood for the garden bed.
I simply set it on top and used a couple of joist fasteners to hold it in place.


I added 1 cubic foot of Hummus & Manure and 4 cubic feet of garden soil.


Here's another view.


Poof! Instant garden. I added 2 kinds of zucchini, 2 kinds of lettuce and 6 cucumbers.


May 29, 2012.
Storm clouds over my house.

Sunday, April 29, 2012

April is all about starting seeds


 I began tilling on April 15th this season. 
This is the farthest garden to the east on my 4 acres. 
It's also the only one that keeps the ground hogs out via black plastic deer fencing. 
I planted 7 shallots and 60 onion sets (white, purple and yellow) on a raised bed.


Next, I created sort of an anything goes bed about 20 feet long and 2 feet across. 
I planted the seeds by broadcasting them over the bed, then raking them in. 
I used 6 varieties of cold weather plants:

Spinach - Giant Noble
Parsnip – Hollow Crown
Radish – German Beer
Spinach – Bloomsdale Long Standing
Lettuce – Jung’s Sweet Repeat
Lettuce – Red Velvet

The next step was to cover the bed with insect netting 
which lets water in but keeps bugs out.


Insect netting also buffers frosty mornings and helps keep things a bit warmer. 
But the main idea is to keep the insects from munching
 on tender greens and roots.


I saw this Red Bartlett pear tree at Gateway Farm & Pet back on 
June 11, 2011 and just had to have it! 
I suspected it was a 5 or 6 year old tree...


Ah ha! This beautiful tree is in full blossom as of the last week of April, 2012.
This must be the 7th year.
I can't wait to see what these pears taste like!


Another nice thing about April is that I can take the tractor batteries off of the trickle chargers
and put them back into the tractors for the season.
The Red Agway is a 1990 and the Orange Husqvarna is a 2001.
I gave them both new spark plugs and they run great!


Meanwhile, back inside... 
I have 3 shop lights blazing 14 hours a day over the seed flats.
The onions were moved out into the greenhouse about 4 weeks ago.
Now, I have 22 varieties of tomatoes, 15 varieties of peppers, 
6 varieties of flowers and many other miscellaneous items 
including my 7 successful rhubarb plants from 2011 seeds.

:)